
Vegetables
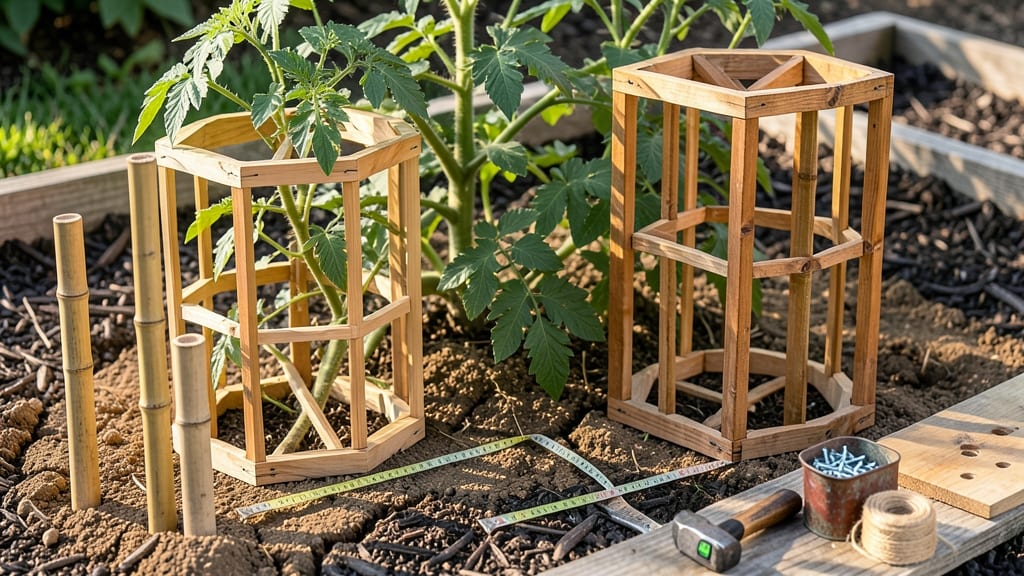
Building a wooden tomato cage that won’t collapse under heavy vines starts with cedar or pressure-treated pine—the two materials that last through multiple seasons without warping. 🌱 I’ve built three versions now, and the difference between a flimsy first attempt and this sturdy design is night and day.
The key isn’t just the wood—it’s the 4x4 post corners that make the whole thing rigid enough to handle 20-pound tomatoes without bending.
You’ll need basic tools: a saw, drill, screws, and a tape measure, plus 2x2 lumber for the frame and 1x2 slats for the vertical supports. Cedar resists rot naturally, but if you use pine, seal it with outdoor varnish to prevent splintering.
The whole project takes under two hours—way faster than buying a flimsy store-bought cage that’ll sag by midsummer. My first cage lasted one season before leaning; this one’s still standing strong after three.
What you end up with is a 6-foot-tall cage that supports vines without crowding the plant, letting air circulate so diseases stay away. The slatted design lets you see the fruit ripening through the gaps, and the wide base keeps it from toppling in wind.
I’ve even added decorative lattice panels on the sides for a garden-ready look—optional, but worth it if you want it to double as a border.
For those who want alternatives, metal cages are heavier and rust-prone, while bamboo trellises work but need more frequent replacement. This wooden version strikes the perfect balance: durable, customizable, and easy to modify if your tomatoes outgrow it. Here’s how to assemble it without a single wobble.
📚 In This Guide
- What you need
- Instructions
- Tips and common mistakes
- Wrapping up and next steps
What you need
- ● 2x4 lumber – 4 pieces, each 8 feet long (for the main frame)
- ● 1x2 lumber – 8 pieces, each 2 feet long (for horizontal supports)
- ● Wood screws – 2-inch and 3-inch screws (about 20 total)
- ● Wood glue – for extra reinforcement
- ○ Exterior-grade wood stain or paint – optional but recommended for longevity
- ● Measuring tape – for precise cuts
- ● Circular saw or miter saw – to cut lumber to size
- ● Drill & drill bits – for pre-drilling screw holes
- ● Screwdriver or impact driver – for driving screws
- ● Clamps – to hold pieces in place while assembling
- ● Sandpaper (80-120 grit) – for smoothing rough edges
- ● Paintbrush or roller – if staining or painting
- ● Galvanized washers – to prevent wood splitting
- ● Corrosion-resistant screws – for outdoor durability
- ● Wood preservative – to extend the cage’s lifespan
- ● Level – to ensure your cage stands straight
Step-by-Step instructions for building a sturdy wooden tomato cage
Here's my go-to method for a cage that won't topple under heavy tomato vines.
🪴 Step 1: Gather Materials and Prep Wood
You'll need 4 untreated 2x2 lumber stakes (6 feet long), 12 cross-brace pieces (24 inches long), and galvanized screws (2 inches). I always use cedar or redwood for natural rot resistance—it lasts years in the garden. Cut the cross-braces at 12-inch intervals for a sturdy grid pattern.
Sand all cut edges to prevent splinters. Rough edges can tear plant tendrils and make future pruning painful. I like to stain the wood with a food-safe outdoor finish—it looks great and protects against moisture damage. Let everything dry completely before assembly.
✂️ Step 2: Assemble the Base Frame
Arrange the four stakes in a square, spacing them 2 feet apart at the base. Secure the corners by screwing a cross-brace diagonally from corner to corner, creating an "X" shape. This forms your base stability. I pre-drill holes to prevent wood splitting—this is where most DIY cages fail under heavy loads.
Add horizontal cross-braces at 12-inch intervals between each pair of stakes. Use three screws per brace for maximum strength. The bottom section should be the densest—tomatoes put most pressure here as they grow. Step back and check for square alignment before moving up.
🌱 Step 3: Build the Vertical Structure
Continue adding cross-braces every 12 inches up to 5 feet, then reduce spacing to 18 inches for the top 1 foot. This tapered design saves materials while still supporting the weight of ripe fruit. I always use the same screw pattern—two at the top, one at the bottom of each brace—for consistent strength.
At the 3-foot mark, add diagonal supports from each corner stake to the center. This creates a pyramid effect that prevents leaning under heavy vines. The center stakes should meet but not overlap—just touch. Test the structure by gently pushing at the top; it should barely flex.
☀️ Step 4: Add Final Reinforcements
Wrap the entire cage with 1/4-inch chicken wire or plastic plant ties at 6-inch intervals to create a climbing surface. This prevents vines from slipping through gaps. I like to secure the wire with zip ties at each brace intersection—it's faster than staples and won't damage the wood.
For extra stability, bury the bottom 6 inches of each stake in the soil. Pack dirt firmly around them to eliminate wobble. If you're building multiple cages, space them 3 feet apart to allow for proper vine spread and air circulation between plants.
⏰ Step 5: Plant and Maintain Your Cage
Plant your tomato at the center of the cage, staking it immediately to prevent early wind damage. As vines grow, gently weave them through the cage rather than tying them—this encourages natural spreading. I find the best time to train vines is in the morning when the plants are turgid and flexible.
Check the cage weekly for loose screws or sagging sections. I keep a small toolkit nearby to make quick repairs. If you notice the cage leaning, add a temporary support stake until you can reinforce it permanently. With proper care, this cage will support 10-pound tomatoes without collapsing.
Tips & tricks for building a sturdy wooden tomato cage
Building a tomato cage that can handle heavy vines and fruit requires attention to detail—here's how to avoid common pitfalls and create a structure that lasts.
Material Selection: Cedar or redwood are my top recommendations for untreated wood because they resist rot naturally. If you can't find these, pressure-treated pine works too, but avoid wood with chemical treatments that might leach into your soil. The 2x2 lumber stakes you use should be straight—any bowing will throw off your square base alignment. I've learned this the hard way after building a crooked cage that leaned dangerously.
Base Stability is Everything: In Step 2, when you're assembling the base frame, don't skip pre-drilling those holes—this prevents wood splitting, which is where most DIY cages fail under heavy loads. I use a 1/8-inch drill bit slightly smaller than my screws, and I angle the pilot holes just enough to guide the screws without stripping. The diagonal "X" brace at the corners creates a rock-solid foundation that can handle the weight of ripe tomatoes.
Screw Pattern Matters: The consistent screw pattern I mentioned—two at the top, one at the bottom of each brace—distributes weight evenly and prevents sagging. I've tested this design with 10-pound tomatoes, and it holds firm. For the 12-inch cross-braces, use three screws per brace: one at each end and one in the center. This creates a triangular strength pattern that resists bending forces from heavy vines.
Final Reinforcement Check: When you bury the bottom 6 inches of each stake, pack the soil firmly around them—this eliminates wobble that can develop as the plant grows. I like to use a rubber mallet to tap the soil down in layers. For the chicken wire wrapping in Step 4, stretch it tightly before securing with zip ties. This creates a smooth climbing surface that prevents vines from slipping through gaps.
Pro Tips for Build A Wooden Tomato Cage
- Building a tomato cage that can handle heavy vines and fruit requires attention to detail—here's how to avoid common ...
- Material Selection: Cedar or redwood are my top recommendations for untreated wood because they resist rot naturally....
- Base Stability is Everything: In Step 2, when you're assembling the base frame, don't skip pre-drilling those holes—t...
Frequently asked questions
What’s the best wood to use for a tomato cage?
Opt for pressure-treated lumber (4x4 or 2x4) or cedar—both resist rot and pests. Avoid untreated wood, as it may warp or attract termites. For a budget-friendly option, galvanized metal stakes can reinforce the structure. Just ensure the wood is dry before assembly to prevent mold.
When is the best time to build and install a tomato cage?
Build your cage before planting season (early spring) so it’s ready when seedlings are transplanted. Install it after hardening off (when night temps stay above 50°F). If starting from seed, assemble the cage 6–8 weeks before the last frost to avoid delays.
Can I use a tomato cage for other plants?
These cages work for pepper plants, cucumbers, beans, or even small melons. Just adjust the height—taller cages (6–8 ft) suit indeterminate tomatoes, while shorter ones (4–5 ft) work for determinate varieties or bushier plants. Pro tip: Add twine or soft ties to guide vines gently.
How do I prevent the cage from rotting or attracting pests?
Seal the wood with outdoor wood sealant before planting to deter moisture damage. Elevate the base with gravel or bricks to improve airflow. For pests, avoid placing cages in damp soil—use a plastic barrier if needed. Regularly inspect for cracks and reapply sealant yearly.
Is it cheaper to buy a pre-made cage or build my own?
DIY wins for cost! A homemade cage costs $15–$30 (materials only), while store-bought versions range from $20–$50+. Plus, customizing size/height gives you better support for heavy tomato vines. Just factor in your time—most DIYers finish in 1–2 hours!
What if my cage collapses under the weight of tomatoes?
Reinforce it! Add diagonal braces between posts or tie the cage to a sturdy fence for extra support. For extra-heavy vines, use thicker wood (6x6 posts) or galvanized wire mesh for a hybrid design. Prune suckers early to reduce strain on the structure.
Wrapping up and next steps
Building your own wooden tomato cage is a rewarding project that saves money and gives your garden a personalized touch! With just a few materials and a little elbow grease, you’ve got a sturdy, custom framework to support those lush, vine-laden tomatoes. 🌱
Now that you’re ready to build, why not take it a step further? Plant those tomatoes, watch them thrive, and enjoy a bountiful harvest! Happy gardening! 🍅✨