
Flowers
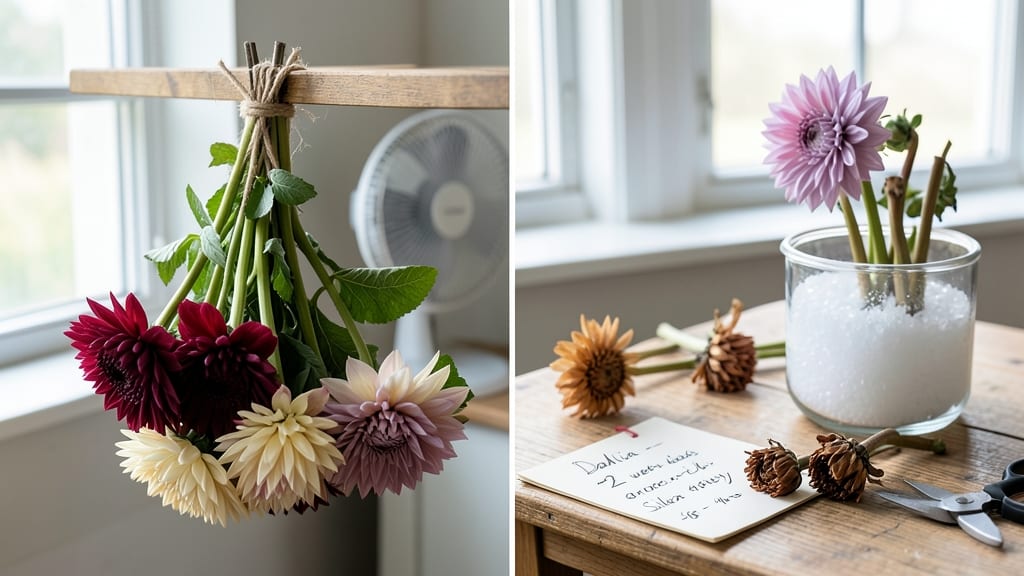
How to dry dahlia flowers turns summer's most dramatic blooms into lasting decor, crafts, or even potpourri that smells like sunshine year-round. ✨ The right drying method preserves their color and shape better than anything else. I've dried hundreds of dahlias, and these methods work every time.
You'll need just a few simple supplies: fresh-cut blooms (pick them early morning), a clean workspace, and either a drying rack, silica gel, or a heavy book for pressing.
The key is timing—wait until flowers are fully open but still firm to the touch. Mistakes like wilting before drying or using damp blooms ruin the results every time.
Air-drying creates delicate, lightweight blooms perfect for wreaths or framed art, while silica gel preserves every petal detail for pressed arrangements. My favorite? The simple "hanging bundle" method that takes 2-3 weeks and requires zero special equipment.
The dried flowers keep their color for years if stored in a cool, dark place.
Once dry, these blooms become unexpected gifts—dried flower crowns, homemade potpourri, or even pressed flower bookmarks. The process is forgiving once you know the secrets, and the payoff is flowers that last long after summer fades. Let's get started with the simplest method first.
📚 In This Guide
- What you need
- Instructions
- Tips and common mistakes
- Wrapping up and next steps
What you need
- ● Fresh dahlia flowers – Choose fully bloomed, healthy flowers with minimal damage (1-2 bunches per batch).
- ● Sharp scissors or pruning shears – For clean cuts (avoid tearing stems).
- ● Newspaper or paper towels – 2-3 sheets to absorb moisture and prevent mold.
- ● Drying method of choice (pick one): Air-drying: A well-ventilated space (e.g., a dark, dry closet or garage).
- ● Microwave drying: A microwave-safe plate (use a low-power setting).
- ● Silica gel drying: Food-grade silica gel beads (1-2 cups per batch).
- ● Oven drying: A low-temperature oven (set to 170°F (77°C)) and a cooling rack.
- ● Rubber bands or twine – To bundle stems for hanging (if air-drying).
- ● Cardboard or paper bags – For storage once dried.
- ● Floral preservative spray – Extends freshness and prevents browning.
- ● Drying screens or mesh bags – Keeps flowers elevated for better airflow.
- ● Desiccant packets – Helps absorb excess moisture in storage.
- ● Glitter or gold leaf – For adding a festive touch to dried blooms.
- ● Labeling tags – To track drying dates and varieties.
Step-by-Step instructions for drying dahlia flowers
Preserve your dahlias' stunning colors and delicate shapes with this simple method that works for any variety.
🌿 Step 1: Harvest at Peak Freshness
Pick dahlias in the early morning when blooms are fully open but still firm to the touch. Look for buds that just began unfolding—they’ll dry flatter than fully mature flowers. Use sharp pruners or scissors to cut stems at a 45-degree angle, about 2 inches below the bloom. This prevents water from pooling and keeps stems healthy.
Remove any damaged petals or leaves from the stems immediately. These can harbor moisture and encourage mold during drying. I like to strip leaves from the bottom 3-4 inches of the stem to reduce bacterial growth. Handle petals gently—they bruise easily, which ruins the final appearance.
⏰ Step 2: Prepare for Drying
Choose one of two methods: air-drying (for whole blooms) or silica gel drying (for petals only). For air-drying, bundle 4-5 stems together and wrap tightly with a paper towel or newspaper. Secure with a rubber band or twist tie, leaving the bloom exposed. This keeps stems upright and prevents petals from touching each other.
If using silica gel, remove petals from the stems and arrange them flat in a single layer inside a shallow container. Cover petals completely with fine silica gel (the kind used for crafts), pressing gently to ensure full contact. Leave for 24-48 hours until petals feel dry and crisp to the touch.
☀️ Step 3: Air-Dry Properly
Hang your bundled dahlias upside down in a dry, dark, well-ventilated space. A closet with a small fan or a basement with good airflow works perfectly. Avoid direct sunlight—it fades petals and causes brittleness. You’ll know they’re ready when stems snap cleanly when bent (about 10-14 days total).
For extra protection, place a silica packet near the drying area to absorb excess moisture. I’ve found that dahlias with thick, fleshy petals (like dinnerplate varieties) take slightly longer to dry—don’t rush them. If petals start curling or darkening, they’re drying too slowly and may need more airflow.
🪴 Step 4: Store Dried Dahlias
Once completely dry, remove blooms from stems and store in airtight containers lined with acid-free tissue paper. I use small cardboard boxes with lids or glass jars to keep moisture out. Label each container with the variety and drying date—some dahlias retain color better than others over time.
Store in a cool, dark place (like a pantry or closet) away from heat sources. Check containers every 3-6 months for signs of moisture or pests. If petals feel damp, spread them out to dry again before resealing. With proper care, your dried dahlias will stay vibrant for 1-2 years—long enough to enjoy their beauty year-round.
✂️ Step 5: Creative Uses for Dried Dahlias
Once dried, dahlias make stunning wreaths, potpourri, or framed botanical art. For wreaths, arrange blooms on a wireframe with floral wire, securing stems with hot glue. For potpourri, mix petals with dried citrus slices and essential oils (like lavender or cedarwood) to enhance fragrance.
To preserve color, avoid exposing dried dahlias to direct sunlight after drying. If petals darken over time, it’s usually due to oxidation—store them in dark containers to slow the process. I’ve even pressed individual petals between heavy books for framed botanical prints—just let them dry flat for 2-3 weeks first.
Tips & tricks for perfectly preserved dahlia blooms
Here's what I've learned after drying hundreds of dahlias—these little details make all the difference between fragile petals and flowers that last for years.
Harvesting Precision: The 2-inch cut below the bloom isn't just about aesthetics—it's about preventing moisture wicking up the stem. I've found that using a sterilized knife or pruners (wipe with rubbing alcohol) gives the cleanest cuts, which dry faster and show less mold. For large dahlias, consider cutting stems at 3 inches to support their weight during drying.
Drying Method Selection: Air drying works beautifully for sturdy dahlias, but for varieties with thin petals, the 24-48 hour silica gel method is a game-changer. Pro tip: Layer the silica beads in 1-inch increments rather than dumping them all at once—this prevents petals from getting buried and ensures even exposure. I also recommend using white food-grade silica (not the blue kind) as it's gentler on delicate petals.
Storage Secret: The cool, dark place mentioned in Step 3 should ideally be 50-60°F—closets with heating vents or attics can get too warm. I've had best results storing dahlias in brown paper bags with holes punched in them—the brown color blocks light better than white paper, and the holes allow for airflow without letting in moisture. For extra protection, place a small silica gel packet in each bag (the kind you get with new shoes works perfectly).
Reviving Tip: When arranging your dried dahlias, I've discovered that a light mist of hairspray mixed with equal parts water (about 50/50) gives stems better hold than plain hairspray alone. The water content helps the stems stay flexible just enough to arrange without becoming soggy. For added durability, I also recommend using floral tape around the stems before inserting into foam—it prevents them from breaking when you handle the arrangement.
Pro Tips for Dry Dahlia Flowers
- Here's what I've learned after drying hundreds of dahlias—these little details make all the difference between fragile petals and flowers that last for years.
- Harvesting Precision: The 2-inch cut below the bloom isn't just about aesthetics—it's about preventing moisture wicking up the stem.
- Drying Method Selection: Air drying works beautifully for sturdy dahlias, but for varieties with thin petals, the 24-48 hour silica gel method is a game-changer.
Frequently asked questions
Got questions about drying dahlias?
You’re not alone! Here are answers to the most common concerns to help you preserve those stunning blooms like a pro.
How long does it take to dry dahlia flowers?
Drying time varies by method! Air-drying takes 2–4 weeks (depending on humidity), while silica gel or microwave methods speed it up to 1–3 days. Patience is key—rush it, and you risk crushing delicate petals.
Can I dry dahlias too quickly, and what happens if I do?
Yes! Overheating (microwave/oven) or forcing air-drying with heat can bleach petals or cause them to crumble. Stick to gentle methods—like hanging upside down in a dark, dry place—to lock in color and texture.
What if my dahlias wilt or droop before drying?
No worries! Revive wilting blooms by submerging stems in cool water for 1–2 hours before drying. For already dried-out flowers, trim stems at an angle and place them in fresh water overnight to plump up.
Will dried dahlias lose their color?
Some fading is normal, but you can minimize it by:
- Choosing deep-colored blooms (they retain vibrancy best).
- Avoiding direct sunlight during drying.
- Using silica gel for crisp, long-lasting hues.
Can I dry dahlias without a screen or mesh?
Try these alternatives:
- Paper bags: Poke holes for airflow, then hang blooms upside down inside.
- Cardboard boxes: Line with paper towels for a DIY drying chamber.
- Silica gel: Bury blooms in the granules for a speedy, no-mess option.
Wrapping up and next steps
Drying dahlia flowers is a simple yet rewarding way to savor their beauty long after summer fades!
With just a few basic tools and a little patience, you can transform wilting blooms into lasting keepsakes—whether for crafts, potpourri, or elegant arrangements. Don’t let those vibrant petals go to waste—try it today!
Ready to preserve more blooms? Next, explore creative ways to use your dried dahlias, like crafting wreaths, making pressed flower art, or even gifting handmade bouquets. Your garden’s magic doesn’t have to end with the season!