
Watering
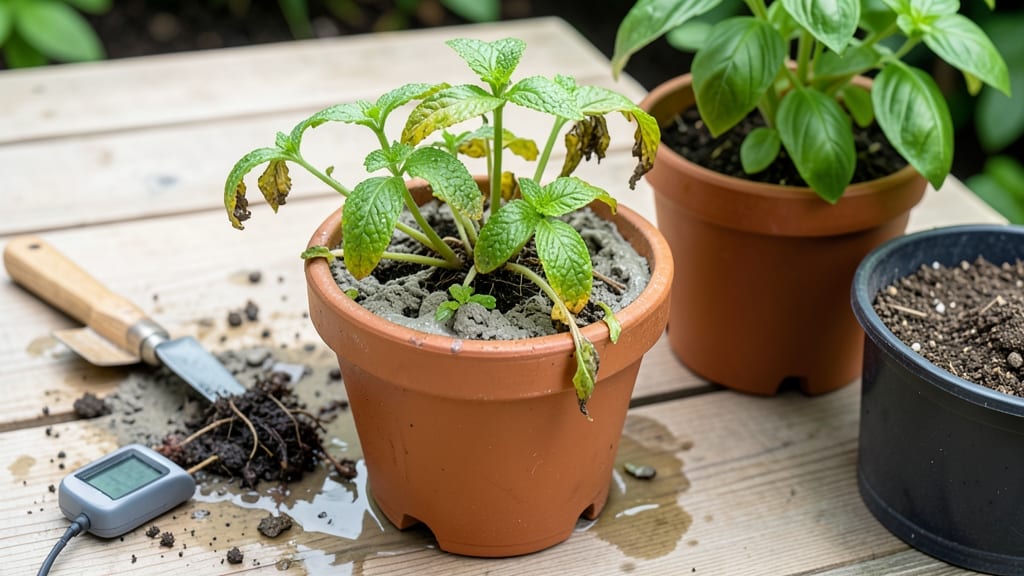
How to dry overwatered soil isn’t a lost cause—it just needs a reset. 🌱 I've nursed back more waterlogged beds than I'd like to admit, and the fix is simpler than you think. The key is stopping the drowning, improving drainage, and giving roots a chance to breathe again without chemicals or drama.
Start by cutting back on watering immediately—your plants are already drowning. Then, loosen compacted soil with a fork or tiller to help water escape, and consider adding organic matter like compost or coarse sand to improve texture.
For containers, drill drainage holes if they're missing, and never let plants sit in saucers of water.
Within a week, you'll see roots recovering as soil dries out and air returns. Mulch helps retain moisture at the right level, and plant roots will start reaching for nutrients again. The best part? This method works for everything from houseplants to backyard gardens—no fancy tools required.
Fair warning: some plants may take longer to bounce back, especially if roots have rotted. Monitor progress by gently tugging plants—if they resist, roots are regaining strength. For stubborn cases, repeat the process until soil feels like a damp sponge, not a swamp.
📚 In This Guide
- What you need
- Instructions
- Tips and common mistakes
- Wrapping up and next steps
What you need
- ● Garden fork or trowel – A sturdy metal or heavy-duty plastic fork (12–18 inches long) to loosen compacted soil without damaging roots.
- ● Perforated drainage tray or saucer – If repotting, use a tray with drainage holes (10+ holes, ¼-inch diameter) to prevent future waterlogging.
- ● Well-draining potting mix – A blend labeled "fast-draining" or "cactus/succulent mix" (avoid peat-heavy soils). Quantity: Enough to fill the pot 2–3 inches below the rim.
- ● Container with drainage holes – If repotting, choose a pot 1–2 inches larger than the current one, with holes in the bottom.
- ○ Spray bottle (optional but handy) – For gentle misting if soil is extremely wet (avoid soaking).
- ○ Household fan or dehumidifier (optional) – Speeds up evaporation in humid climates. Aim for low airflow to avoid drying roots too quickly.
- ● Remove the plant from its current pot – Gently slide it out to inspect roots for rot (mushy, black, or foul-smelling = trim with sterilized scissors).
- ● Check humidity levels – If your space is consistently above 60% humidity, drying soil will take longer. Use a hygrometer if unsure.
- ● Work in a well-ventilated area – Soggy soil can smell musty—open windows or use a fan while working.
Step-by-Step instructions for reviving overwatered soil
Here’s how I turn soggy, root-strangling soil back into a breathable home for plants—no chemicals, just patience and the right moves.
💧 Step 1: Stop Watering and Assess the Damage
First, halt all watering immediately. Roots need air to recover, and adding more moisture just delays the fix. Let the soil surface dry out enough to touch—you’ll know it’s ready when the top 1-2 inches feel cool and crumbly rather than slick and cold. This usually takes 24-48 hours depending on humidity.
Check for signs of distress: yellowing leaves, mushy stems, or a foul smell mean roots are suffocating. If you see mold on the soil surface, that’s a red flag—it’s thriving in the wet conditions and needs to dry out ASAP. Grab a handful of soil and squeeze gently; if it holds its shape like clay, it’s still too wet.
✂️ Step 2: Loosen Compacted Soil and Improve Drainage
Use a fork or trowel to gently loosen the top 4-6 inches of soil. This breaks up the dense, waterlogged clumps and lets air circulate to the roots. Work slowly—you’re not digging a hole, just creating pockets for oxygen. If the soil feels like wet cement, it’s been overwatered for too long, and you’ll need to be extra careful.
Next, sprinkle a ½-inch layer of coarse sand or perlite over the surface. This isn’t just decoration—it acts as a drainage layer, preventing future water from pooling. Mix it lightly into the top inch of soil so it blends in but doesn’t clump. Avoid fine sand or mulch here; you want something gritty that won’t compact.
☀️ Step 3: Move Plants to Better Conditions
If your plants are in containers, relocate them to a spot with bright, indirect light and good airflow. Direct sun right now will stress already weakened roots, but shade alone won’t fix the problem—you need that airflow to dry the soil faster. If they’re in the ground, prune back any yellow or mushy leaves to reduce stress on the plant while the roots recover.
For container plants, prop them up on a wire rack or bricks to elevate them slightly. This helps excess moisture drain out the bottom faster. If the soil is still dripping water after a few hours, tip the pot sideways to let it drain completely—don’t leave it sitting in saucers full of water, even if it’s “just for a little while.”
🌱 Step 4: Monitor and Gradually Resume Care
Wait until the soil is dry to the touch 1-2 inches down before watering again. Stick your finger in—if it feels damp but not wet, it’s ready. When you do water, use the soak-and-dry method: give a deep drink until water runs out the drainage holes, then wait until the top 1-2 inches are dry before watering again. This mimics natural rainfall and prevents future sogginess.
Watch for new growth as a sign of recovery—healthy roots will start pushing out fresh leaves within 1-2 weeks. If the plant still looks weak after that, it might need a light fertilizer (like a diluted seaweed solution) to rebuild strength, but hold off until you see signs of life. Overwatered soil recovery is a marathon, not a sprint.
Tips & tricks for reviving soggy soil
Real talk: I've seen more plants suffer from overwatering than from any other mistake—and the good news is, most of them can be saved with these simple adjustments. Here's how to turn that waterlogged mess into healthy growing conditions.
Patience is Key: Those 24-48 hours of waiting in Step 1 are non-negotiable. I've tried rushing the process, and trust me, it never works. Instead, think of this as a recovery period where roots get their first breath of fresh air in days. Place a small fan nearby to gently increase airflow—just enough to speed up evaporation without stressing the plant. This can cut your drying time by 12-24 hours in humid conditions.
The Right Tools Make All the Difference: For Step 2, grab a fork with wide tines—not a spade—because you're creating air pockets, not digging a trench. I like using a garden fork because it lets me work gently in tight spaces. If you don't have one, a sturdy butter knife will work in a pinch. The goal is to loosen without damaging roots, so go slow and use the tool's weight, not force.
Drainage Layer Secrets: When adding that ½-inch layer of coarse sand or perlite in Step 2, don't just sprinkle it on top—work it into the surface soil. This creates a permanent drainage network right where roots need it most. Pro tip: If you're using perlite, rinse it first to remove any dust, which can clog the soil's pores. For container plants, mix a handful into the existing soil before repotting to prevent future sogginess.
Light and Airflow Balance: In Step 3, that bright indirect light is crucial—think of it as physical therapy for your plants. Place them near an east-facing window where they'll get morning sun without the harsh afternoon heat. If you're using grow lights, keep them 6-12 inches above the plants and run them for 12 hours a day. The airflow from a small oscillating fan (set on low) can make all the difference in drying out containers faster.
Pro Tips for Dry Overwatered Soil
- Real talk: I've seen more plants suffer from overwatering than from any other mistake—and the good news is, most of t...
- Patience is Key: Those 24-48 hours of waiting in Step 1 are non-negotiable. I've tried rushing the process, and trust...
- The Right Tools Make All the Difference: For Step 2, grab a fork with wide tines—not a spade—because you're creating ...
Frequently asked questions
about drying overwatered soil—because even the greenest thumbs need a little extra help! Here are answers to the most common concerns to get your plants back on track.How long does it take for overwatered soil to dry out?
Drying time depends on soil type, pot size, and humidity. Sandy soil may dry in 1–3 days, while clay or dense mixes can take 5–10 days. Check moisture by sticking your finger 1–2 inches deep—if it’s still damp, wait longer. Patience is key!
Can I speed up the drying process?
Yes! Move potted plants to a bright, dry spot (like a sunny windowsill) and avoid covering with plastic. For garden beds, improve drainage by adding organic matter (compost or perlite) or creating shallow trenches to redirect water. A fan on low can also help evaporate moisture faster.
What if my plant’s roots are already rotting?
Don’t panic! First, stop watering immediately and let the soil dry. If roots are mushy or black, trim the damaged ones with sterilized scissors, then repot in fresh, well-draining soil. Rooting hormone can help healthy roots regrow. For severe cases, consider propagation from healthy stems.
Is it safe to use a hairdryer to dry the soil?
While a hairdryer can dry the surface quickly, it’s not recommended for deep soil drying—it can overheat roots or create uneven moisture levels. Instead, opt for passive methods like airflow or a dehumidifier. If you must use heat, keep it on low and maintain a safe distance.
How do I know if my plant is recovering?
Watch for these signs: firm stems (not wilting or soft), new growth at the tips, and soil that stays dry between waterings. Yellow leaves may linger, but healthy green foliage and a perky appearance mean your plant is bouncing back! Adjust watering habits to prevent future soggy soil.
Wrapping up and next steps
Reviving overwatered soil doesn’t have to be stressful—with the right techniques, you can bring life back to your plants naturally! By adjusting watering habits, improving drainage, and using simple tools like sand or perlite, you’ll create a healthier root environment.
Remember, patience and consistency are key—your plants will thank you with stronger growth.
Now that you’re equipped with these solutions, take action today! Start with one plant or section of your garden and monitor progress. Soon, you’ll have a thriving, well-balanced soil ecosystem—no chemicals required! 🌱✨