
Orchid Care
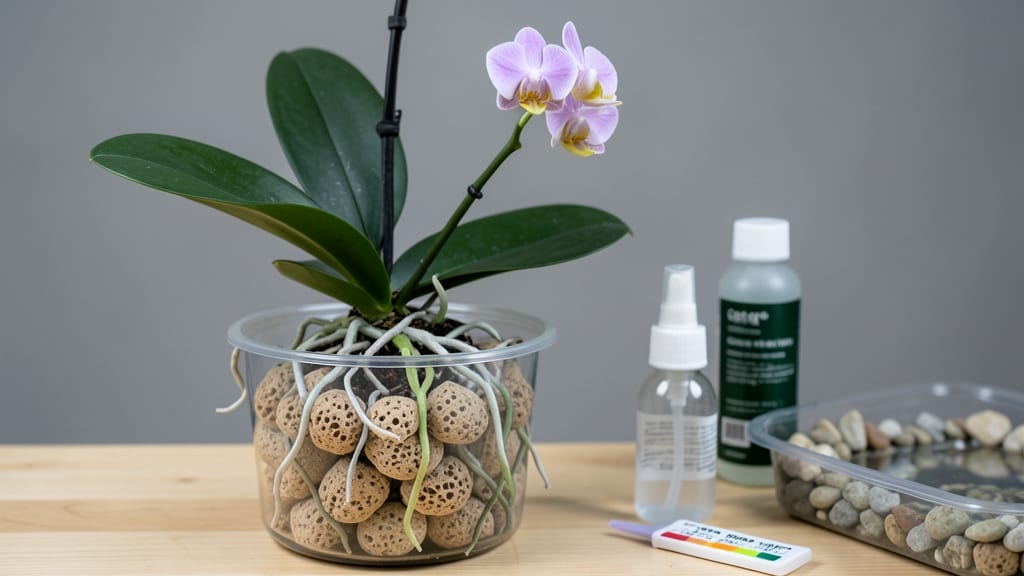
How to grow orchids in LECA changed how I think about orchid care. 🌱 The moment I saw those hydrated roots thriving in clear containers, I knew traditional bark mixes were holding me back. LECA—lightweight expanded clay aggregate—keeps roots oxygenated and visible, so you can monitor health at a glance.
You'll need a clear plastic pot with drainage holes, LECA pebbles (3/8" to 1/2" size), distilled water, and your orchid plant. No soil, no moss—just clean, airy roots.
The setup takes 15 minutes, and once established, orchids bloom year-round with proper care. My Phalaenopsis now produces 4-5 spikes annually instead of one.
Watering becomes a science of observation: roots should look hydrated but not soggy. Mistakes like overwatering or poor drainage lead to root rot, but LECA's structure prevents that.
The system also keeps pests at bay—no more hidden grubs in bark media. You'll notice new growth within 4-6 weeks if everything's right.
This method works for Phalaenopsis, Dendrobium, and even Cattleyas, though humidity needs vary. My 60% humidity** setup keeps everything thriving without a humidifier. The key is patience—LECA orchids take 2-3 months to fully adjust, but the payoff is worth it.
📚 In This Guide
- What you need
- Instructions
- Tips and common mistakes
- Wrapping up and next steps
What you need
- ● LECA Clay Pebbles: Size: 3/8" to 1/2" (ideal for orchid roots and aeration)
- ● Quantity: 1–2 gallons per 6-inch pot (adjust for pot size)
- ● Tip: Rinse thoroughly before use to remove dust! 💡
- ● Orchid Pots: Material: Plastic with drainage holes (or ceramic with slits)
- ● Size: 6"–8" diameter (scalable for orchid size)
- ● Orchid: Healthy specimen with no signs of rot or pests 🌱
- ● Mounted or potted orchids (e.g., Phalaenopsis, Dendrobium)
- ● Watering Tools: Spray bottle (for misting)
- ● Watering can with rose nozzle (for deep soaks)
- ● Fertilizer: Balanced orchid fertilizer (20-20-20 or 10-10-10)
- ● Diluted to ½–¼ strength (to avoid root burn)
- ○ Support: Moss (e.g., Sphagnum) for mounting (optional)
- ● Trellis or stake (for climbing orchids)
- ● pH testing kit (ideal range: 5.5–6.5)
- ● Humidity tray or pebble tray (for 50–70% humidity)
- ● Grow lights (LED or fluorescent, 12–14 hours/day)
- ● Rooting hormone (for propagation)
- ● Decorative stones (for aesthetics in pots)
Step-by-Step instructions for growing orchids in LECA
Here's my foolproof method for healthy orchids with vibrant blooms—no more root rot or guesswork.
🪴 Step 1: Prepare Your LECA and Container
Start by rinsing your LECA (Lightweight Expanded Clay Aggregate) thoroughly under cool water to remove any dust or debris. Soak the LECA for 10-15 minutes until they sink to the bottom of the container—this ensures they’re fully hydrated before planting. Drain them completely in a colander or sieve, then let them air-dry for 5 minutes so they’re damp but not dripping.
Choose a container with drainage holes—plastic or ceramic pots work well. I like to use pots that are slightly wider than the orchid’s root spread to allow for airflow. Place a layer of LECA at the bottom of the pot, about 1-2 inches deep, to create a stable base for the orchid. This prevents the plant from sitting in stagnant water while still keeping the roots hydrated.
🌱 Step 2: Repot Your Orchid into LECA
Gently remove your orchid from its current pot, being careful not to damage the roots. If the plant is root-bound, you can gently tease the roots apart to encourage outward growth. Place the orchid in the center of your prepared container, ensuring the roots are spread evenly over the LECA. The base of the orchid should sit just above the LECA—not buried—so the roots can access moisture and air freely.
Add more LECA around the roots, pressing lightly to secure the orchid in place. The LECA should fill the container up to about 1 inch below the rim, leaving space for water to pool slightly during watering. Avoid compacting the LECA too tightly, as this can restrict airflow and lead to rot. If your orchid has pseudobulbs, position them so they’re slightly elevated—this mimics their natural growing conditions.
💧 Step 3: Water and Establish the Hydration Cycle
After repotting, give your orchid a thorough soak by placing the container in a sink or basin filled with lukewarm water for 10-15 minutes. This allows the LECA to absorb moisture evenly without oversaturating the roots. Remove the pot and let it drain completely—any water left in the saucer should evaporate within 30 minutes. Over time, you’ll develop a rhythm: water when the top layer of LECA feels dry to the touch, usually every 7-10 days.
Here’s the thing—orchids in LECA thrive on consistency. I water mine in the morning so the roots have the entire day to dry out slightly before nightfall. Avoid misting the leaves, as excessive moisture on the foliage can promote fungal growth. Instead, focus on soaking the roots directly. You’ll know your watering routine is right when the LECA stays damp but never soggy, and the roots appear plump and silvery-green.
☀️ Step 4: Provide the Right Light and Temperature
Orchids need bright, indirect light to bloom well—think of it as morning sun with afternoon shade. A spot near an east-facing window is ideal, but if that’s not an option, use a grow light positioned 12-18 inches away for 12-14 hours daily. Too much direct sun will scorch the leaves, while too little light means fewer blooms. You’ll spot the perfect balance when the leaves are a vibrant green and the new growth appears firm and upright.
Keep your orchid in a space with temperatures between 65-80°F during the day and a 10°F drop at night to encourage blooming. If your home stays consistently warm, place the orchid near a window with cooler airflow or use a small fan on low to simulate natural conditions. Avoid drafts or sudden temperature swings, as these can stress the plant and cause buds to drop.
⏰ Step 5: Monitor and Maintain for Long-Term Success
Check your orchid’s roots every 2-3 weeks—healthy roots should be firm and silvery-green when hydrated. If you notice roots turning brown or mushy, reduce watering frequency or improve airflow. On the other hand, if the roots look shriveled or gray, it’s time to water. Fertilize every 4-6 weeks during the growing season with a balanced orchid fertilizer diluted to half-strength to avoid salt buildup in the LECA.
Real talk: Orchids in LECA are low-maintenance once you get the hang of it. The key is patience—it can take 3-6 months for an orchid to adjust to its new environment and start producing blooms. If your orchid isn’t flowering, it might need more light or a slight temperature shift. Keep track of its progress, and don’t hesitate to adjust your care routine based on what you observe.
Tips & tricks for perfect orchid care in LECA
Here's what nobody tells you about keeping your orchids thriving in this unique growing medium.
LECA Hydration Insight: During that 10-15 minute soak in Step 1, don't just eyeball it—use a timer. The LECA needs time to fully absorb moisture, but leaving it too long can create anaerobic conditions that harm roots. I've found that 12 minutes is the sweet spot for most orchid varieties, giving you that perfect balance of hydration without oversaturating. The 5-minute air-dry afterward is crucial too—it prevents waterlogging while keeping the LECA damp enough for planting.
Root Exposure Technique: When repotting in Step 2, resist the urge to bury the orchid's base completely. The roots should be spread over the LECA with just the rhizome (the thickened stem base) visible above the medium. This mimics their natural epiphytic growth habits. I've seen beginners bury the rhizome too deep, which leads to rot—always keep that base elevated by about ¼ inch above the LECA surface.
Light Monitoring Hack: For that 12-14 hours of grow light in Step 4, I recommend using a simple light meter app on your phone to check intensity. Orchids need about 1,000-2,000 foot-candles of light. Too little and you'll get sparse blooms; too much and you'll get sunburned leaves. Position your grow light at 16 inches initially, then adjust based on your meter readings—this prevents the guesswork that leads to leggy growth or scorched foliage.
Temperature Transition Strategy: Creating that 10°F nighttime drop mentioned in Step 4 doesn't require fancy equipment. Simply move your orchid to a cooler spot overnight—like a basement window sill or near an exterior door (but not in a draft!). I've found that even a 5°F drop can trigger blooming in some varieties, though the full 10°F is ideal. Just avoid sudden temperature swings—gradual changes are what orchids respond to best.
Pro Tips for Grow Orchids In Leca
- Here's what nobody tells you about keeping your orchids thriving in this unique growing medium.
- LECA Hydration Insight: During that 10-15 minute soak in Step 1, don't just eyeball it—use a timer. The LECA needs ti...
- Root Exposure Technique: When repotting in Step 2, resist the urge to bury the orchid's base completely. The roots sh...
Frequently asked questions
Got questions about growing orchids in LECA?
You’re not alone! Here are answers to the most common concerns—from beginners to seasoned growers—to keep your orchids thriving in this unique medium.
How often should I water orchids in LECA?
Water orchids in LECA every 2–3 days in warm climates or every 4–5 days in cooler ones. The goal is to keep the roots hydrated but not soggy—tap the LECA stones; if they sound hollow, they’re dry enough. Overwatering is the #1 killer, so err on the side of less frequent watering until you gauge your orchid’s needs.
Can I use LECA for orchids in winter?
LECA works year-round, but adjust your watering schedule in winter. Cooler temps slow evaporation, so check moisture levels more carefully. If your home is dry (e.g., heated), water every 5–7 days. Avoid ice-cold water—use room-temperature to prevent root shock.
What if my orchid’s roots turn black in LECA?
Black or mushy roots? It’s often root rot from overwatering or poor airflow. Remove the orchid from LECA, trim dead roots with sterilized scissors, and repot into fresh, dry LECA. Let it recover in a bright spot (no direct sun) and reduce watering. If the crown smells foul, it may need rescue—consider a temporary move to bark mix while it heals.
Can I switch my orchid from soil to LECA?
Yes, but do it gradually to avoid shock. Start by bottom-watering your orchid in soil for 2 weeks to hydrate the roots, then gently remove it and rinse off the old medium. Soak the roots in water for 10 minutes before repotting into LECA. Monitor closely for the first month—some orchids (like Phalaenopsis) adapt easily, while others (like Cattleyas) may need extra humidity.
Are there alternatives to LECA for hydroponic orchids?
If LECA isn’t your style, try clay pebbles (similar but heavier) or kin bark chunks (for semi-hydroponics). For a no-medium approach, air layering or wicking systems (with coconut coir) work too. Just ensure great airflow and avoid stagnant water—orchid roots need oxygen!
Wrapping up and next steps
Growing orchids in LECA isn’t just a trend—it’s a game-changer for healthier roots, vibrant blooms, and year-round beauty! 🌸 By mastering the right setup, watering routine, and light balance, you’ve unlocked a low-maintenance yet rewarding way to nurture your orchids.
The key? Patience and consistency—your plants will thank you with lush foliage and stunning flowers.
Ready to take the next step? Experiment with different orchid varieties in LECA or share your progress with fellow growers! 🌱 Whether you’re troubleshooting or celebrating a new bloom, your orchid journey is just getting started—keep exploring and enjoying the magic of hydrated roots.