
Container Gardens
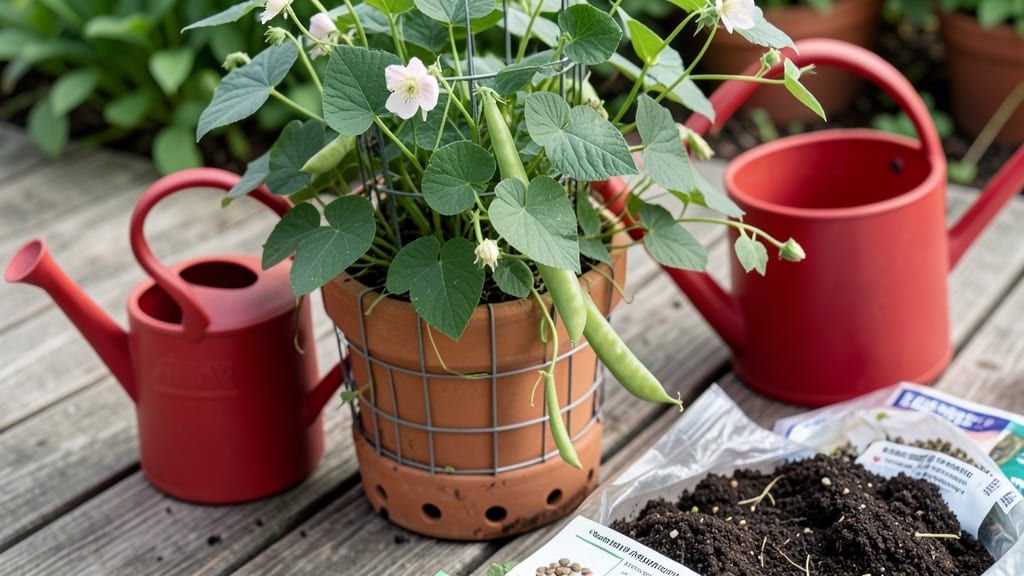
How to grow black-eyed peas in containers turns tiny spaces into protein-packed harvests. 🌱 I've grown them in 5-gallon buckets on my fire escape, and they thrive—no yard needed. These heat-loving legumes fix nitrogen in the soil while producing tender pods perfect for stir-fries or salads.
The secret lies in 5-gallon containers with drainage holes, warm sunlight (6+ hours daily), and well-draining soil mixed with compost. Plant seeds 1 inch deep, 4 inches apart, and keep soil consistently moist but never soggy. In just 60-70 days, you'll harvest pods—earlier than most garden peas.
Watch for powdery mildew in humid climates (space plants well) and aphids (blast off with water). Companion plants like basil or marigolds deter pests while adding flavor. Once you master this, you'll never buy canned peas again—the fresh ones taste like summer in every bite.
Bonus: These vines climb naturally, so add a small trellis or let them sprawl. Perfect for balconies, patios, or even sunny windowsills. Let's get those seeds sprouting!
📚 In This Guide
- What you need
- Instructions
- Tips and common mistakes
- Wrapping up and next steps
What you need
- ● Container: At least 12-inch deep (black-eyed peas need room for roots). Use 5-gallon buckets, fabric grow bags, or large pots (5+ gallons per plant). Ensure they have drainage holes!
- ● Potting Mix: Well-draining, organic mix (avoid garden soil). A 50/50 blend of potting soil and compost works great. 1 bag (1.5–2 cubic feet) per container.
- ● Black-Eyed Pea Seeds: 4–6 seeds per container (they’re drought-tolerant but thrive with companions like okra or peppers!). Choose heirloom or disease-resistant varieties (e.g., ‘Purple Hull’ or ‘Crowder’).
- ● Watering Can or Hose: With a gentle spray nozzle to avoid displacing soil.
- ● Fertilizer: Balanced, slow-release granular fertilizer (10-10-10) or compost tea. Apply at planting and again when flowers appear.
- ○ Trellis or Cage (Optional but Helpful): A 5-foot tall stake or tomato cage to support vines (black-eyed peas climb!).
- ● Sunlight: Full sun (6–8+ hours daily). Place containers on a south- or west-facing balcony/patio.
- ● Temperature: Warm soil (60–90°F). Start seeds indoors 4–6 weeks before last frost or direct-sow after soil warms in spring.
- ● Water: Consistent moisture (1–1.5 inches per week). Let soil dry slightly between waterings to prevent rot.
- ● Test Soil pH: Aim for 6.0–6.8. Use a soil test kit if unsure (black-eyed peas prefer slightly acidic soil).
- ● Mulch: Add straw or shredded leaves to retain moisture and regulate temperature.
- ● Companion Planting: Pair with basil, marigolds, or radishes to deter pests naturally!
Step-by-step instructions for growing black eyed peas in containers
Here's my foolproof method for growing these nitrogen-fixing powerhouses in limited spaces—no sprawling vines required.
🌱 Step 1: Choose the Right Containers and Drainage
Black eyed peas need deep roots, so select containers that are at least 12-18 inches deep—5-gallon buckets or large fabric grow bags work perfectly. I always add 3-4 drainage holes in the bottom if they're not already present, covered with landscape fabric to prevent soil loss. The wider the container, the better—18-24 inches in diameter gives vines room to climb without crowding.
Place containers where they'll get 6-8 hours of full sun daily. A south-facing patio or balcony gets the most light, but even east or west exposures work if you supplement with a grow light during cloudy stretches. I position mine on casters so I can rotate them weekly—this ensures even growth and prevents lopsided plants.
🌿 Step 2: Prepare Soil and Plant Seeds
Fill containers with a mix of 60% potting soil, 30% compost, and 10% perlite to create a loose, well-draining medium. Black eyed peas are legumes, so I add a handful of mycorrhizal fungi to the soil mix—this helps roots establish a symbiotic relationship with nitrogen-fixing bacteria. Moisten the mix until it's damp but not soggy, then let it settle for 24 hours before planting.
Plant 3-4 seeds per container, burying them 1 inch deep in a small mound of soil. This encourages straight upward growth rather than sprawling vines. After planting, water gently until the soil is evenly moist. Place a small stake or trellis next to each plant immediately—even young vines will start reaching for support within days.
✂️ Step 3: Provide Support and Maintain Growth
As soon as seedlings reach 3-4 inches tall, gently weave them around the trellis or stake. I use 3-foot tall bamboo stakes for single plants and 5-foot tall wire cages for containers with multiple plants. The vines will twine naturally, but you may need to guide them occasionally as they grow.
Water when the top 2 inches of soil feel dry, aiming for 1 inch of water per week. Black eyed peas are drought-tolerant once established, but consistent moisture during flowering and pod development ensures better yields. I always water at the base to prevent fungal diseases that can develop from wet foliage.
🌱 Step 4: Fertilize and Encourage Flowering
Legumes like black eyed peas fix their own nitrogen, so I avoid heavy fertilization. Instead, I use a balanced organic fertilizer (5-5-5) at half strength every 4-6 weeks starting when plants reach 6 inches tall. The key is to promote flowering without encouraging excessive foliage growth. You'll know you're doing it right when you see yellow blossoms forming within 6-8 weeks.
Here's the thing—black eyed peas need consistent warmth to set pods. If nighttime temperatures dip below 55°F, cover plants with a frost blanket for a few nights. This protects the flowers and encourages pod development. Once pods appear, reduce watering slightly to prevent them from splitting open prematurely.
🌿 Step 5: Harvest and Extend the Season
Harvest pods when they're 2-3 inches long and firm to the touch—this is when they're most tender and flavorful. I pick every 2-3 days during peak production to encourage more flowering. Use pruning shears to snip pods cleanly, leaving the vine intact. Regular harvesting keeps plants productive for 8-10 weeks in ideal conditions.
To extend the harvest, deadhead spent flowers by pinching them off at the base. This redirects the plant's energy toward new blooms rather than seed production. In cooler climates, you can even overwinter plants by moving containers to a protected spot or greenhouse, where they'll often regrow in spring. Just be prepared to trim back any frost-damaged foliage come spring.
Tips & tricks for growing black eyed peas in containers
These practical insights will help you maximize your container garden's potential and avoid common pitfalls with these hardy legumes.
Container Depth Matters: The 12-18 inch depth requirement isn't arbitrary—black eyed peas develop deep taproots that need room to establish. I've seen containers that were only 10 inches deep fail to produce well because the roots became root-bound. If you're using repurposed containers, measure twice before planting. For extra insurance, add 2-3 inches of compost to the bottom layer to encourage root growth downward.
Light Optimization Strategy: Those 6-8 hours of daily sunlight are non-negotiable, but here's what I do when my balcony gets afternoon shade: I rotate containers weekly to expose all sides to maximum light. For east-facing spaces, supplement with a 12-inch grow light for 4-6 hours after sunset during cloudy periods. The key is maintaining consistent light exposure—uneven light causes lopsided growth and poor flowering.
Soil Science Secret: The mycorrhizal fungi addition in Step 2 isn't just optional—it's essential for nitrogen fixation. If you can't find mycorrhizal powder, mix in 1/2 cup of well-aged compost from your garden (the type with visible fungal threads). This creates the symbiotic relationship that makes black eyed peas such excellent nitrogen-fixers. Think of it as planting a mini ecosystem in your container that will feed future plants.
Harvest Timing: The 2-3 inch pod size window is critical—any longer and they become tough and stringy. I harvest every morning during peak season because pods can grow from tender to overripe in just 24 hours. Use a pair of sharp pruning shears to avoid damaging the vine, and always harvest from the bottom up to encourage upward growth. The first pods will appear around week 6-8, so stay vigilant once flowering begins.
Pro Tips for Grow Black Eyed Peas In Containers
- These practical insights will help you maximize your container garden's potential and avoid common pitfalls with thes...
- Container Depth Matters: The 12-18 inch depth requirement isn't arbitrary—black eyed peas develop deep taproots that ...
- Light Optimization Strategy: Those 6-8 hours of daily sunlight are non-negotiable, but here's what I do when my balco...
Frequently asked questions
Got questions about growing black-eyed peas in containers?
You’re not alone! Here are answers to the most common queries to help you succeed—no matter your experience level.
How deep should the container be for black-eyed peas?
Black-eyed peas thrive in containers that are at least 12–18 inches deep. This gives their roots enough space to spread while supporting the vine’s growth. If you’re growing them as a bush type (like ‘Purple Hull’), a 10-inch depth may suffice, but vining varieties need extra room. Use a 5–6 gallon container per plant for best results.
How long does it take for black-eyed peas to grow in containers?
From seed to harvest, black-eyed peas typically take 60–90 days in containers, depending on the variety and growing conditions. Vining types may take slightly longer (up to 3 months) because they focus energy on climbing. Start seeds indoors 4–6 weeks before the last frost or sow directly after soil warms to 60°F+ for faster germination.
Can I grow black-eyed peas in containers without trellising?
Yes! While trellising (like with a 5-foot tall cage or teepee) maximizes yield and saves space, black-eyed peas can grow bush-style in wider containers (12+ inches in diameter). Just space plants 4–6 inches apart and prune regularly to encourage bushier growth. Expect smaller pods but still bountiful harvests.
What are the most common pests for container-grown black-eyed peas?
Watch for aphids, spider mites, and Mexican bean beetles—they love tender young leaves and pods. Prevent pests with neem oil or insecticidal soap, and inspect plants weekly. Handpick beetles early in the day when they’re sluggish. Copper tape around container edges deters crawling pests like slugs.
Can I grow black-eyed peas in containers over winter?
Black-eyed peas are warm-season crops and won’t survive frost, but you can extend the season in mild climates. Use black containers to absorb heat or place pots in sunny spots near walls. Harvest before temps drop below 40°F, or grow them indoors near a south-facing window with grow lights for a late-winter harvest.
Pro Tip:
Struggling with slow growth? Test your soil pH—black-eyed peas prefer 6.0–6.8. If your container mix is too alkaline, amend with cottonseed meal or sulfur to boost acidity. Yellow leaves? It might be nitrogen deficiency—feed with a balanced fertilizer (10-10-10) every 3–4 weeks.
Wrapping up and next steps
Growing black-eyed peas in containers is a rewarding way to enjoy fresh, flavorful harvests—even in small spaces!
With the right setup, you’ll get a steady supply of these nutrient-packed legumes while keeping your garden tidy and efficient. Start small, stay consistent with care, and soon you’ll be savoring homegrown peas in soups, salads, or snacks!
Ready to take the next step? Try experimenting with different varieties or companion plants to maximize your container garden’s potential. Happy growing! 🌱