
Size
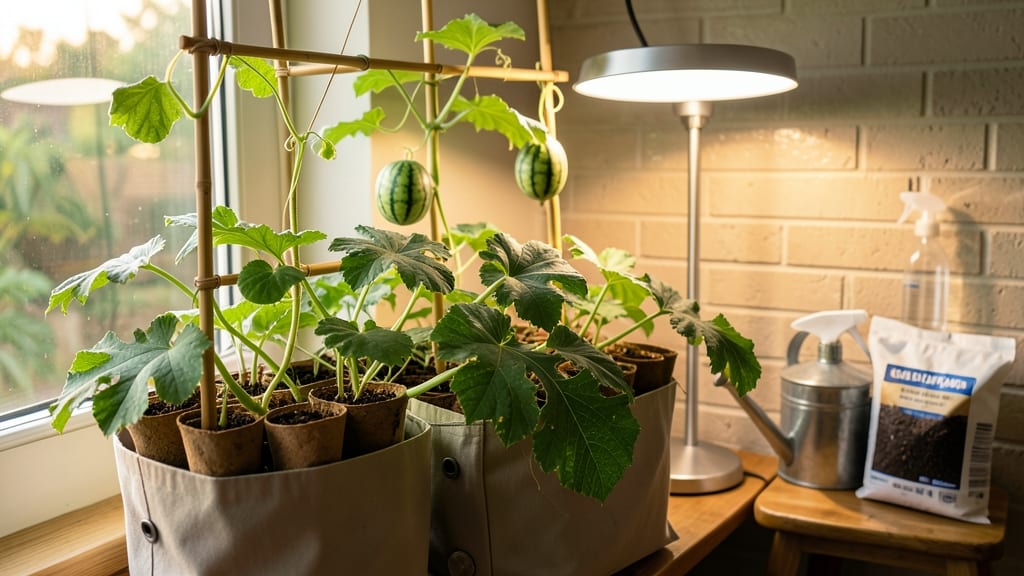
How to grow watermelon inside isn’t just possible—it’s shockingly rewarding. 🌱 I've turned a sunny balcony into a mini watermelon patch, and the first bite of that homegrown fruit in July makes every inch of vine worth it. The secret? Choosing the right compact varieties and mimicking their natural growing conditions as closely as possible.
You'll need a 5-gallon container minimum per plant, well-draining soil mix, and a way to provide 6-8 hours of direct sunlight daily. Most people fail at this because they underestimate the vine's space needs or skimp on light—both lead to sad, leggy plants with tiny fruit.
The good news? With proper support and care, you can grow varieties like 'Sugar Baby' or 'Tiny Tim' that stay manageable even in small spaces.
By midsummer, you'll be harvesting 3-5 pound melons that taste sweeter than anything from the store. The vines need consistent moisture but hate soggy roots, and you'll need to hand-pollinate flowers if you're not near bees.
The first ripe melon appears around 70-80 days from seed, and the smell of that first cut watermelon in your kitchen will change how you garden forever.
This works best in warm climates or extended growing seasons, but even cooler areas can succeed with grow lights and early starts. The key is patience—watermelons take time, but the payoff of that first homegrown slice makes every challenge worth it. Let's get those seeds started!
📚 In This Guide
- What you need
- Instructions
- Tips and common mistakes
- Wrapping up and next steps
What you need
- ● Watermelon Seeds or Seedlings: Choose compact or dwarf varieties like 'Sugar Baby,' 'Tiny Tim,' or 'Minnesota Midget' (vines stay under 6 ft).
- ● Quantity: 2–4 seeds (or 1–2 seedlings) per container.
- ● Containers: Minimum 5-gallon pots (18+ inches deep) for 1 vine, or a large fabric grow bag (3–5 gallons).
- ● Drainage holes are a must—add a tray underneath to catch runoff.
- ● Growing Medium: High-quality potting mix (sterile, well-draining). Avoid garden soil!
- ○ Optional: Mix in 10–20% perlite or coco coir for aeration.
- ● Support System: Trellis or cage (4–6 ft tall) for vertical growth (saves space!).
- ● Or a sturdy tomato cage (if vines stay under 5 ft).
- ● Fertilizer: Balanced liquid fertilizer (10-10-10 or 5-5-5) for seedlings.
- ● Switch to low-nitrogen, high-potassium (e.g., 0-10-10) when flowers appear.
- ● Tools: Hand trowel, pruning shears, and a spray bottle (for misting).
- ● pH test kit (ideal range: 6.0–6.8).
- ● Sunlight: 6–8 hours of direct sunlight daily (south-facing window or grow lights).
- ● Temperature: Keep indoors between 70–90°F (21–32°C) during the day.
- ● Humidity: Aim for 40–70% (use a humidifier or pebble tray if air is dry).
- ● Water: 1–2 inches per week (let soil dry slightly between waterings).
- ● Self-watering planter to maintain moisture.
- ● Grow lights (LED full-spectrum, 12+ hours/day if natural light is limited).
- ● Mulch (straw or black plastic) to retain soil moisture.
- ● Pollination aid: A small paintbrush to hand-pollinate flowers if bees aren’t visiting.
Step-by-step instructions for growing watermelon indoors
Here's how to coax sweet, compact watermelons from your balcony—no greenhouse needed.
🪴 Step 1: Select the Right Container and Variety
Choose a 5-gallon container with drainage holes for each plant—watermelons need room for roots to spread. I recommend compact varieties like 'Sugar Baby' or 'Tiny Tim,' which stay under 3 feet when trained properly. These stay manageable in containers while still producing 4-6 pound melons. Avoid standard varieties—they'll sprawl uncontrollably indoors.
Fill the bottom 2 inches with gravel or perlite for drainage. This prevents root rot, which is deadly for watermelons. After planting, keep the pot elevated on a stand or in a saucer to catch any overflow. The goal is to mimic outdoor conditions as closely as possible while working with limited space.
☀️ Step 2: Provide Full-Spectrum Light and Warmth
Watermelons need 12+ hours of bright light daily, so place your containers near a south-facing window or under full-spectrum LED grow lights. If using natural light, rotate the pot quarter-turn daily so the vine grows evenly. You'll notice leaves stretching toward the light? That's a sign it's not getting enough—move it closer or add supplemental lighting.
Keep the soil temperature at 75-85°F for best growth. A seedling heat mat under the pot helps maintain warmth, especially in cooler climates. Place a thermometer in the soil to monitor—watermelons wilt quickly if roots get chilly. A small fan on low circulation also strengthens stems by simulating outdoor breezes.
💧 Step 3: Water Deeply and Fertilize Strategically
Water deeply when the top 2 inches of soil feel dry—watermelons hate soggy roots but need consistent moisture. I use a drip irrigation system or water at the base with a gentle stream to avoid disturbing the soil. Overhead watering can spread disease, so aim for the roots. After watering, let excess drain completely—standing water is a fast track to root rot.
Start fertilizing 2 weeks after planting with a balanced liquid fertilizer (10-10-10) diluted to half-strength. Switch to a low-nitrogen, high-potassium formula (like 5-10-15) when flowers appear to encourage fruiting. Feed every 2 weeks during growing season, but reduce to once a month in winter. Too much nitrogen makes vines lush but fruitless.
🌱 Step 4: Train Vines and Support Growth
Use a trellis or sturdy cage to guide vines upward—this saves space and keeps fruit accessible. I train the main vine along a 5-foot tall trellis, pruning side shoots to 2-3 leaves to focus energy on fruit production. Watermelons are heavy, so secure the trellis to a wall anchor or freestanding frame to prevent tipping.
When flowers appear, hand-pollinate by gently rubbing a paintbrush or cotton swab between blooms to transfer pollen. Watermelons need cross-pollination, and indoor air movement can limit natural pollinators. Watch for yellowing leaves—this often signals poor pollination or nutrient deficiency. If you see small, misshapen fruit, pollination failed and you'll need to try again.
⏰ Step 5: Harvest at Peak Ripeness
Harvest when the underneath turns cream-colored and the stem near the vine darkens. Tap the melon—it should sound hollow when ripe. Cut the stem with clean pruners, leaving a 1-inch stem attachment to preserve freshness. Indoor-grown melons mature faster than outdoor varieties, so expect 70-80 days from planting to harvest.
Store harvested melons in a cool, dry place (55-65°F) for up to 2 weeks. If your climate stays warm year-round, consider extending the season by replanting every 2 months for continuous harvests. The first fruit might be small, but subsequent vines grow stronger with proper care—and you'll have sweet, vine-ripened watermelon right on your balcony.
Tips & tricks for growing watermelon indoors
Here's what nobody tells you about coaxing those sweet, compact melons from your balcony—these tricks make all the difference.
Container Depth Matters: While a 5-gallon container is the minimum, consider going up to 7 gallons if possible. Deeper containers allow roots to establish better, especially for varieties like 'Sugar Baby' that produce 4-6 pound melons. The extra space prevents root binding, which can stunt growth and reduce fruit size. I've seen plants in 5-gallon pots struggle when temperatures dip below 75°F—the roots just don't have enough room to buffer temperature swings.
Light Quality Over Quantity: That 12+ hours of light requirement is non-negotiable, but here's the secret: quality matters more than you think. If you're using LED grow lights, opt for full-spectrum bulbs with a color temperature of 6500K—this mimics natural sunlight and prevents that leggy, weak growth. I've had better results with a single high-quality LED light placed 6-8 inches above the plants than with multiple cheaper bulbs. And if you notice leaves turning yellow between veins, that's a classic sign of light deficiency—time to move closer to the window or add supplemental lighting.
Soil Temperature is Everything: You can't just keep the air warm—you need to monitor soil temperature at the root level. That 75-85°F range is critical for germination and early growth. I use a small soil thermometer inserted 2 inches deep, right where the roots are. If your apartment stays cool at night, consider moving the containers to a warmer spot during the evening. I've had plants wilt dramatically overnight only to recover perfectly when I adjusted their location. Pro tip: Black containers absorb more heat during the day, helping maintain that crucial temperature range.
Pruning Strategy for Bigger Fruit: When training your main vine along that 5-foot trellis, don't be afraid to get aggressive with pruning. Remove all side shoots except the first 2-3 leaves—this forces the plant to put all its energy into producing fewer, but larger, melons. I've gone from tiny 2-pound watermelons to proper 5-pounders just by being ruthless with my pruners. And here's a bonus: those pruned side shoots can be propagated in water to grow new plants, giving you more melons from the same original vine!
Pro Tips for Grow Watermelon Inside
- Here's what nobody tells you about coaxing those sweet, compact melons from your balcony—these tricks make all the di...
- Container Depth Matters: While a 5-gallon container is the minimum, consider going up to 7 gallons if possible. Deepe...
- Light Quality Over Quantity: That 12+ hours of light requirement is non-negotiable, but here's the secret: quality ma...
Frequently asked questions
Got questions about growing watermelons indoors? You’re not alone—this method is still new for many! Here are answers to the most common queries to help you crush your indoor watermelon goals.
Can I grow watermelons indoors year-round?
Yes, but with caveats! Watermelons thrive in warm weather (70–90°F), so you’ll need grow lights (14–16 hours/day) and a heat mat in cooler months. For year-round success, use dwarf or mini varieties like ‘Sugar Baby’ or ‘Tiny Tim’—they’re bred for compact spaces and tolerate indoor conditions better. Just watch for leggy vines if light is insufficient.
How long does it take for indoor watermelons to ripen?
Indoor watermelons typically take 70–90 days to mature, depending on the variety. Dwarf types like ‘Minnesota Midget’ may ripen in as little as 60 days, while larger varieties could stretch to 3 months. Start seeds early (or use transplants) and monitor pollination—hand-pollinate with a small paintbrush if bees aren’t visiting your balcony!
What’s the best indoor setup for watermelons?
A 5-gallon container per plant is ideal, with a trellis or sturdy cage to support vines (they can grow 6–10 feet long!). Place pots near a south-facing window or under LED grow lights (full-spectrum, 20,000–30,000 lux). Use a well-draining potting mix with added compost, and ensure proper drainage—watermelons hate soggy roots!
How do I pollinate watermelons indoors?
Since bees won’t visit, you’ll need to hand-pollinate! Use a small paintbrush or cotton swab to transfer pollen from the male flowers (long stems) to the female flowers (small fruit forming at the base). Do this in the morning for best results. Repeat every 2–3 days until female flowers stop appearing—this signals the end of the pollination window.
Why aren’t my indoor watermelons sweet or growing?
Common culprits include:
- Insufficient light: Leggy vines or small fruit? Boost light exposure to 14+ hours/day.
- Poor pollination: Check for flowers and hand-pollinate if needed.
- Overcrowding: Thin vines to 1–2 per plant to avoid competition.
- Temperature stress: Keep soil warm (70–85°F) with a heat mat if below 60°F.
- Nutrient deficiency: Feed with a balanced fertilizer (like 10-10-10) every 2–3 weeks.
If fruit forms but stays hard, it may need more time—indoor melons often ripen slower than outdoor ones!
Wrapping up and next steps
Growing watermelons indoors isn’t just possible—it’s a rewarding way to enjoy fresh, sweet fruit even in small spaces! 🌱 With the right containers, light, and care, you can cultivate compact vines that deliver juicy rewards. Start small, stay patient, and watch your balcony bloom with flavor.
Ready to take the next step? Pick your favorite variety, gather your supplies, and get planting—your future harvest is just a few seeds away! 🍉✨